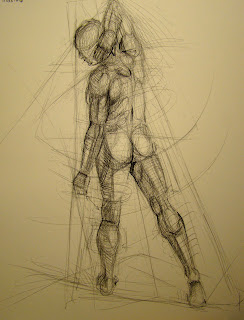
by Darwin Leon
Part 1
Gesture drawing or suggestion in drawing is definitely one of the most powerful tools you will ever use in your lifetime as a fi
What is gesture drawing?
This is the process of drawing quick, lightly without erasing with a constant movement and focused on the subject. The concept of gesturing is the idea of capturing in a suggestive way a sketch of what the brain has already seen. I strongly recommend this exercise in any art class in the planet and in any subject, technique or style. I must say this technique is universal and always works. I personally have found this approach of incredible benefit and developmental in my personal work for years now. For any contemporary fine artist the idea of suggesting in drawing is a powerful, effective and timeless tool.
Suggestive drawing is basically capturing a basic main idea of the subject matter in a fast and light sketch drawing.
The benefits of gesture and suggestive drawing
We can almost safely say that these two are totally related. When you are doing a gesture drawing you are basically suggesting. As any other technique in the arts, gesture drawing requires exercise and repetition. Repetition is the key for this exercise success. The benefits and advantages are endless. After repeating this exercise for a long time consistently you will notice a general improvement in your drawing skills such as observation, composition, line quality and proportions. Since you are drawing fast, the circumstances are forcing you to spend more time observing with deep concentration at the subject obsessively with a very objective approach.
Gesture drawing should be u
Your line definition will improve dramatically and your observation skills will step another level. You must become visually obsessive with your subject matter when gesture drawing. Also, you must read every single contour line of the figure and feel it deeply in your eyes until it reaches your mind solid
Build lines even for the angles. In this way you are already positioning your figure in the right places, angles and distances. For example, quickly draw a line to position the level position of the shoulders or clavicles and note from your point of view which one is lower and which one is higher. Same for the hip bones, feet angles and distance, and center line for the torso (upper body). Eventually your lines will evolve and you will discover more lines that will help you in the angles and positioning process. Eventually drawing will become more fun instead of an issue.
Adding shapes to 
I strongly recommend to get into the habit of building shapes when gesture drawing. “Think shapes”. In here you wanna get creative. Gesture drawing and shapes must be married. The effect of shapes in your suggestive drawing creates a very positive result. Instead of always building just lines to achieve line contours, you want t

In here you are improvising. It is really up to you how far you wanna go with this shapes. The more shapes the more structured your figure will be. And when the time comes to correct, you already have a very strong basic foundation to work from. Remember, there is no way to correct if you don't have something. Shapes applies for everything and it is a great composition detector. When you have a figure or more than one, or multiple complex compositions there is the overall shape. This is visualizing and thinking big. The over all shape will give you the illusion of an abstract shape that encloses all the figures into one composition. For instance, some figures resembles the geometric shape of a triangle like the one showed in this post.
Here is a general basic hint list of what parts and muscles to look when gesturing, suggesting and massing:
Head (forehead, eye cavities, nasal bone, mouth, chin, high/low cheek, ears, jaw, upper/back skull, neck-sternocleidomastoid)
Shoulders (deltoids, clavicles, trapezius)
Chest (pectoralis major, sternum)
Abs (rectus abdominus)
Love handles (external oblique)
Arms (biceps, triceps, forearm extensors and flexors, forehand, fingers)
Side body( serratus anterior, latissimus dorsi)
Pelvic area – hip bones (visible gluteus medius)
Upper legs ( adductors of thigh, rectus femoris, vastus medialis, vastul external or lateralis, femur bone)
Knee (patela)
Lower legs (gastrocnemius, soleus, peroneous, tibia bone)
Feet (ankle, heel, arch, ball of foot, instep, toes)
Upper back torso ( trapezius, infraspinatus, teres minor/major, latissimus dorsi, lumbar area, external oblique, deltoid, gluteus medius/maximus)


2 comments:
Again the examples are great and it is well explained.
Thanks for the blog!
All this information is very interesting. We know about The Network, how ever if we want to see a visualization can be result weird for every one. Although the image are complex and difficult to understand, it help us to visualize the social structures. costa rica investment opportunities is a network very interesting too.
Post a Comment